How to: Recycle Rubber Hoses into a Chair


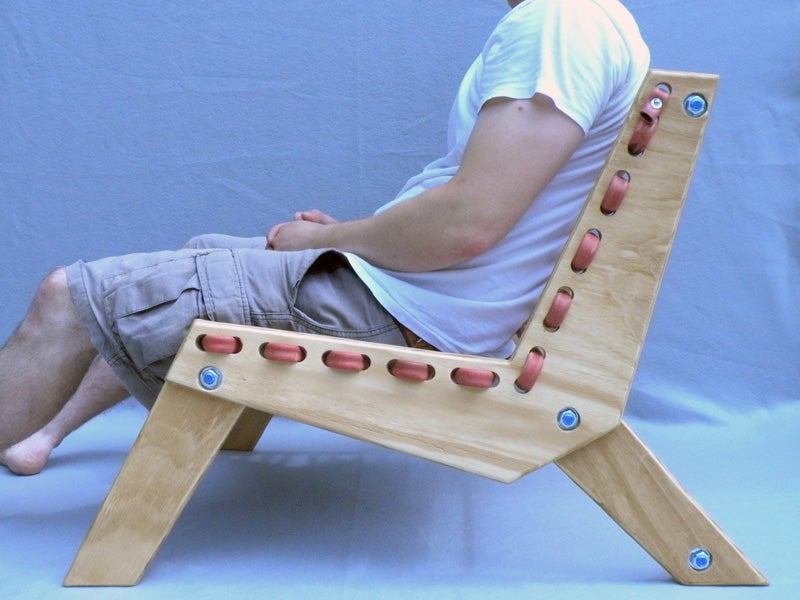
Clean modern lines, wood and metal supports … one could almost imagine this being sold at your local contemporary furniture store for thousands of dollars. Except: that comfortable-looking lining threaded between the structural frame is an ordinary, everyday recycled garden hose. Total cost? About twenty bucks.

A few pieces of plywood, threaded metal rods, washers and bolts are all that is needed to construct the supporting elements on the sides of the seat. The standard-sized rubber hose is then woven between holes punched in the ply.

By stretching the length of hose tightly across the frame, weight becomes evenly distributed along all lines of rubber that stretch to create the comfortable and flexible surface of the finished furniture object. Pivot joints at the front and back of the main seating element allow for various heights and angles and thus maximum comfort.
“Nearly every job site or good-sized shop has rubber air hose for running nail guns or a multitude of other tubes. The hose in this project is 3/4″ in diameter, about 45 feet long, and is made from tough, flexible rubber. In a former life it was used to run a spray gun for lacquering cabinets. After developing leaks at both ends, it was retired. The rubber is in decent shape, but it shows its age with hairline cracks and thick coating of grime. It was easy to clean with some denatured alcohol and rags. Once clean, cut off the brass or steel fittings at each end.”
“The resulting chair is really comfortable. It feels like sitting on rubber bands. The trick is to have narrow enough spacing and a tight-enough weave so that your weight is evenly distributing across as many lengths of hose as possible, which will in turn evenly distribute the stress on the hose, preventing sagging and long-term decay.”

Get the full details at Instructables.